cs144-lab0:网络热身
项目实现:https://github.com/hyperv0id/cs144
1-环境搭建
1.1-wsl安装
2-网络实验
2.1-获取网页
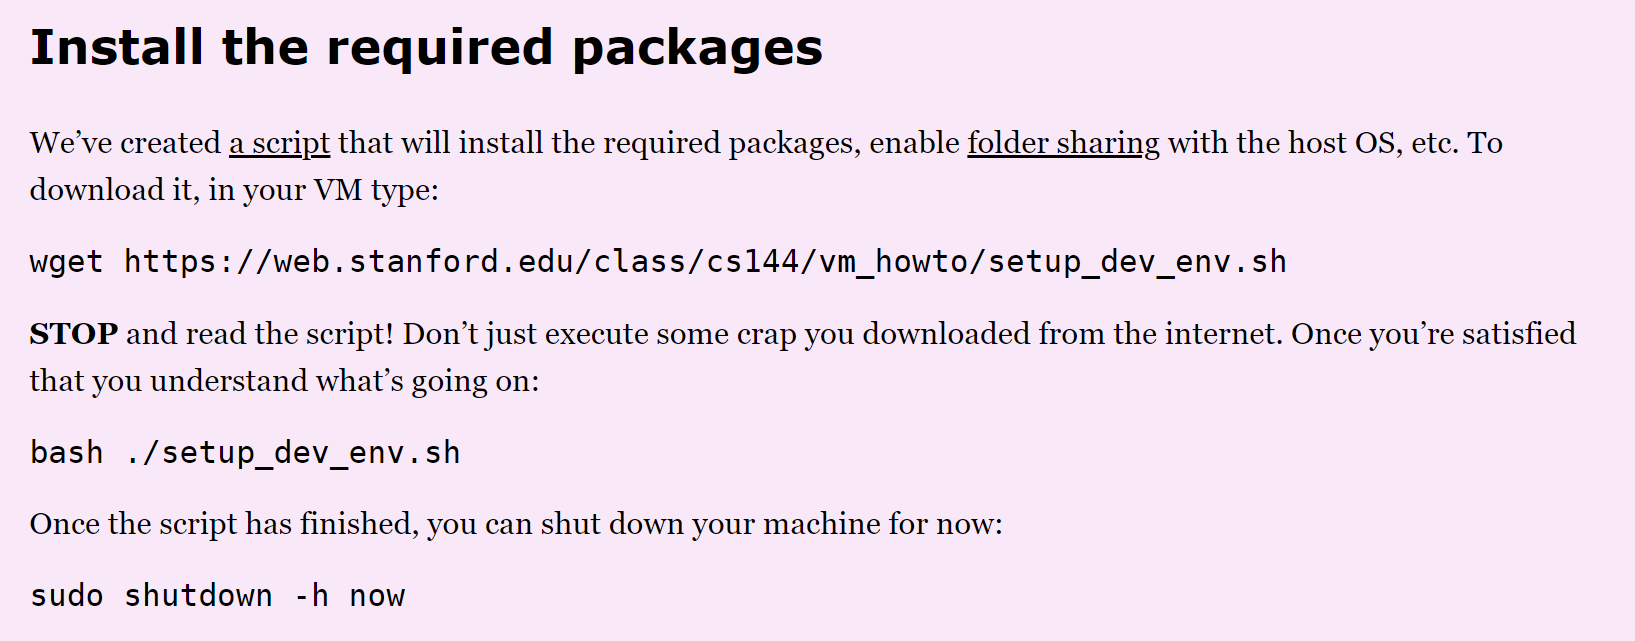
在终端输入命令:这个命令表示使用telnet给网页发送http请求
telnet cs144.keithw.org http

显示成这样就表示连接成功,不过我们还得配置请求头:
GET /hello HTTP/1.1
Host: cs144.keithw.org
Connection: close
回车两次,会出现下列内容,如果超时了再试一次
如果手速过慢会失败,这时可以将header保存为文件,使用管道传输给telnet
cat lab0_2.1.in - | telnet cs144.keithw.org http # 从 lab0_2.1.in 文件中读取数据并自动输入到telnet作业:
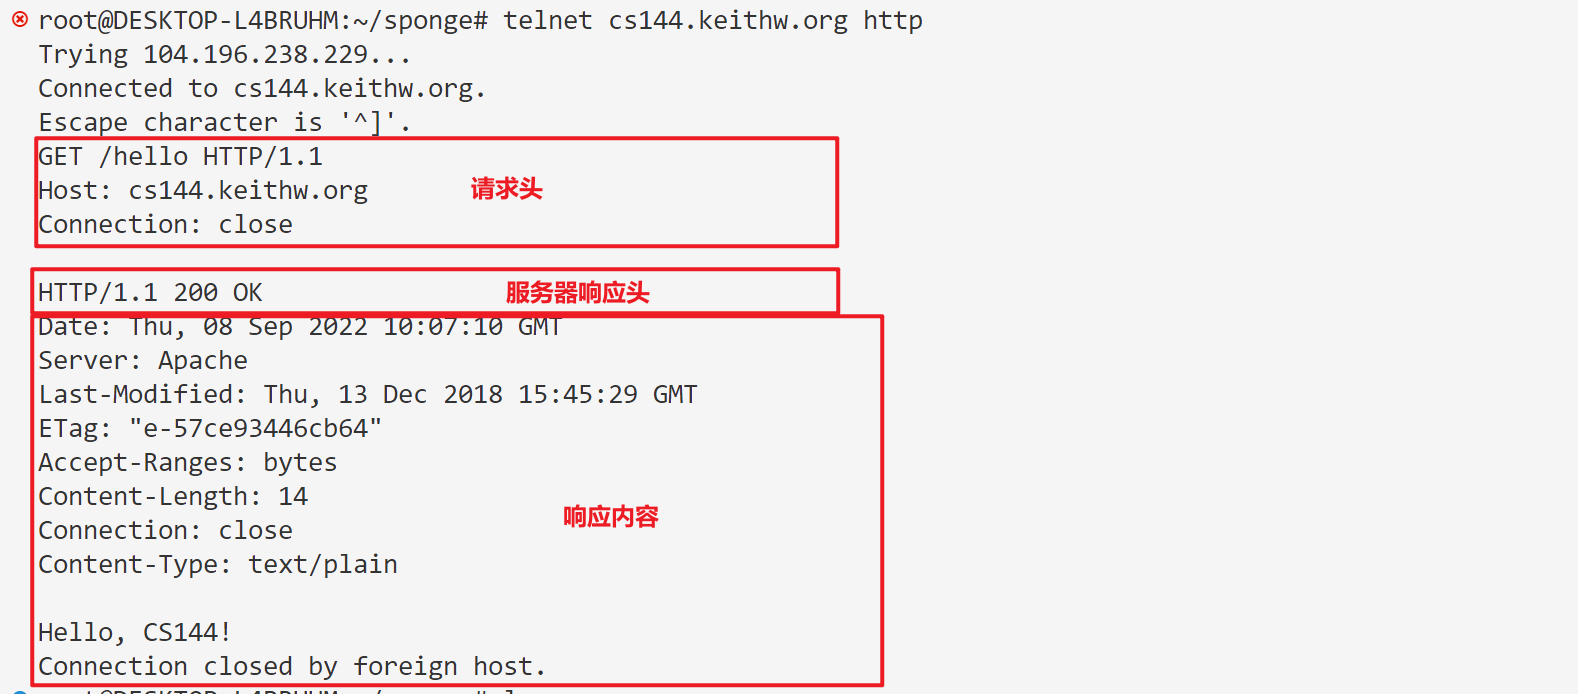
现在您已经知道如何手动获取Web页面,向我们展示您可以!使用上述技术获取URL http://cs144.keithw.org/lab0/sunetid,将sunetid替换为您自己的主SUNet ID。你会在“X-Your-Code-Is:”的标题中收到一个密码。保存您的SUNet ID和代码,以便写入您的记录。
telnet cs144.keithw.org http

GET /lab0/43998848 HTTP/1.1 Host: cs144.keithw.org Connection: close
输出:
2.2-发送邮件
这个需要斯坦福学生身份
2.3-双工通信
打开两个终端,先后分别输入
netcat -v -l -p 9090
telnet localhost 9090
这分别表示在创建服务器并监听9090端口,和连接9090端口,成功效果如下

这时两边已经建立通信,可以对话了

3-系统socket
下面我们将编写获取网页的小程序
3.1-启动代码
1 - 克隆项目地址
git clone https://github.com/cs144/sponge
2 - 构建项目
cd sponge
mkdir build
cd build
cmake ..
make -j4
3.2-C++
3.3-sponge项目文档
-
特别注意
FileDescriptor,Socket,TCPSocket和Address类。(注意,套接字是FileDescriptor的一种类型,TCPSocket是套接字的一种类型。) -
阅读头文件: file_descriptor.hh、socket.hh、address.hh
3.4-实现webget方法
void get_URL(const string &host, const string &path) {

    // 1. 建立 TCP 连接

    Address addr(host, "http");
    TCPSocket sc; // 创建 TCP 连接对象
    sc.connect(addr); // 连接到远程地址

    // Your code here.

    // You will need to connect to the "http" service on
    // the computer whose name is in the "host" string,
    // then request the URL path given in the "path" string.

    // 2. 发送HTTP请求
    string msg = "GET " + path + " HTTP/1.1\r\n"; //注意必须以 \r\n 结尾
    msg += "Host: "+host+"\r\n";
    msg += "Connection: closed\r\n\r\n";
    sc.write(msg);
    sc.shutdown(SHUT_WR); // 表示不在向对方传输信息

    // Then you'll need to print out everything the server sends back,
    // (not just one call to read() -- everything) until you reach
    // the "eof" (end of file).

    // 3. 从服务端接收消息
    while (!sc.eof())
    {
        cout << sc.read();
    }

    // 4. 关闭 TCP 连接
    sc.close();

    // cerr << "Function called: get_URL(" << host << ", " << path << ").\n";
    // cerr << "Warning: get_URL() has not been implemented yet.\n";
}
// ./apps/webget cs144.keithw.org /hello
// make check_webget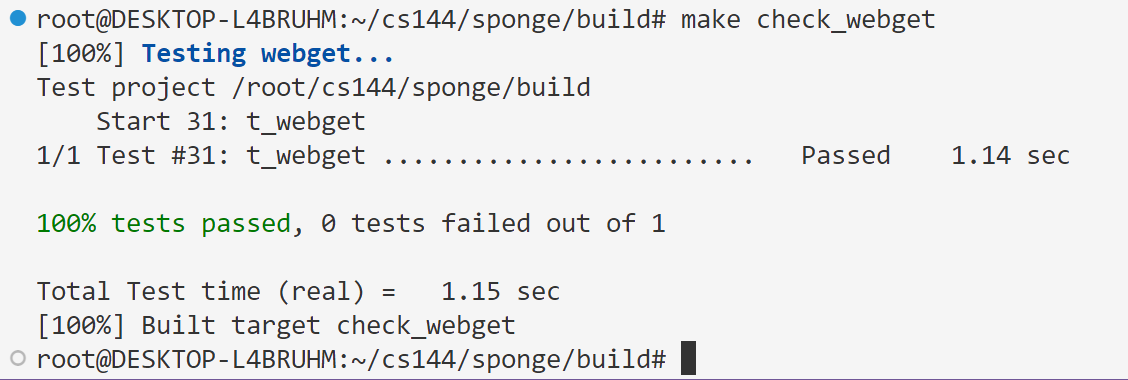
4-内存可靠的字节流
头文件
#ifndef SPONGE_LIBSPONGE_BYTE_STREAM_HH
#define SPONGE_LIBSPONGE_BYTE_STREAM_HH

#include <string>
#include<deque>

//! \brief An in-order byte stream.

//! Bytes are written on the "input" side and read from the "output"
//! side.  The byte stream is finite: the writer can end the input,
//! and then no more bytes can be written.
class ByteStream {
  private:
    // Your code here -- add private members as necessary.

    // Hint: This doesn't need to be a sophisticated data structure at
    // all, but if any of your tests are taking longer than a second,
    // that's a sign that you probably want to keep exploring
    // different approaches.

    std::deque<char> _buf = {}; // 数据流对象
    size_t _capa = 0; // 容量大小
    size_t nread = 0, nwrite = 0; //读写字符数

    bool is_end = false; // 是否结束

    bool _error{};  //!< Flag indicating that the stream suffered an error.

  public:
//...
}
源文件
#include "byte_stream.hh"

// Dummy implementation of a flow-controlled in-memory byte stream.

// For Lab 0, please replace with a real implementation that passes the
// automated checks run by `make check_lab0`.

// You will need to add private members to the class declaration in `byte_stream.hh`

template <typename... Targs>
void DUMMY_CODE(Targs &&... /* unused */) {}

using namespace std;

ByteStream::ByteStream(const size_t capacity) {
    _capa = capacity;
    nwrite = 0;
    nread = 0;
}

size_t ByteStream::write(const string &data) {
    size_t nadd = min(_capa - _buf.size(), data.length());
    this->nwrite += nadd;
    for (size_t i = 0; i < nadd; i++)
    {
        _buf.push_back(data[i]);
    }

    return nadd;
}

//! \param[in] len bytes will be copied from the output side of the buffer
string ByteStream::peek_output(const size_t len) const {
    size_t length = min(len, _buf.size());

    return string().assign(_buf.begin(), _buf.begin()+length);
}

//! \param[in] len bytes will be removed from the output side of the buffer
void ByteStream::pop_output(const size_t len) {
    size_t length = min(len, _buf.size());
    this->nread += length;
    while(length--)
    {
        _buf.pop_front();
    }
}

//! Read (i.e., copy and then pop) the next "len" bytes of the stream
//! \param[in] len bytes will be popped and returned
//! \returns a string
std::string ByteStream::read(const size_t len) {
    string msg = peek_output(len);
    pop_output(len);

    return msg;
}

void ByteStream::end_input() {this->is_end = true;}

bool ByteStream::input_ended() const { return is_end; }

size_t ByteStream::buffer_size() const { return _buf.size(); }

bool ByteStream::buffer_empty() const { return _buf.empty(); }

bool ByteStream::eof() const { return _buf.empty() && is_end; }

size_t ByteStream::bytes_written() const { return nwrite; }

size_t ByteStream::bytes_read() const { return nread; }

size_t ByteStream::remaining_capacity() const { return _capa - _buf.size(); }
功能测试
更新代码并测试
make
make check_lab0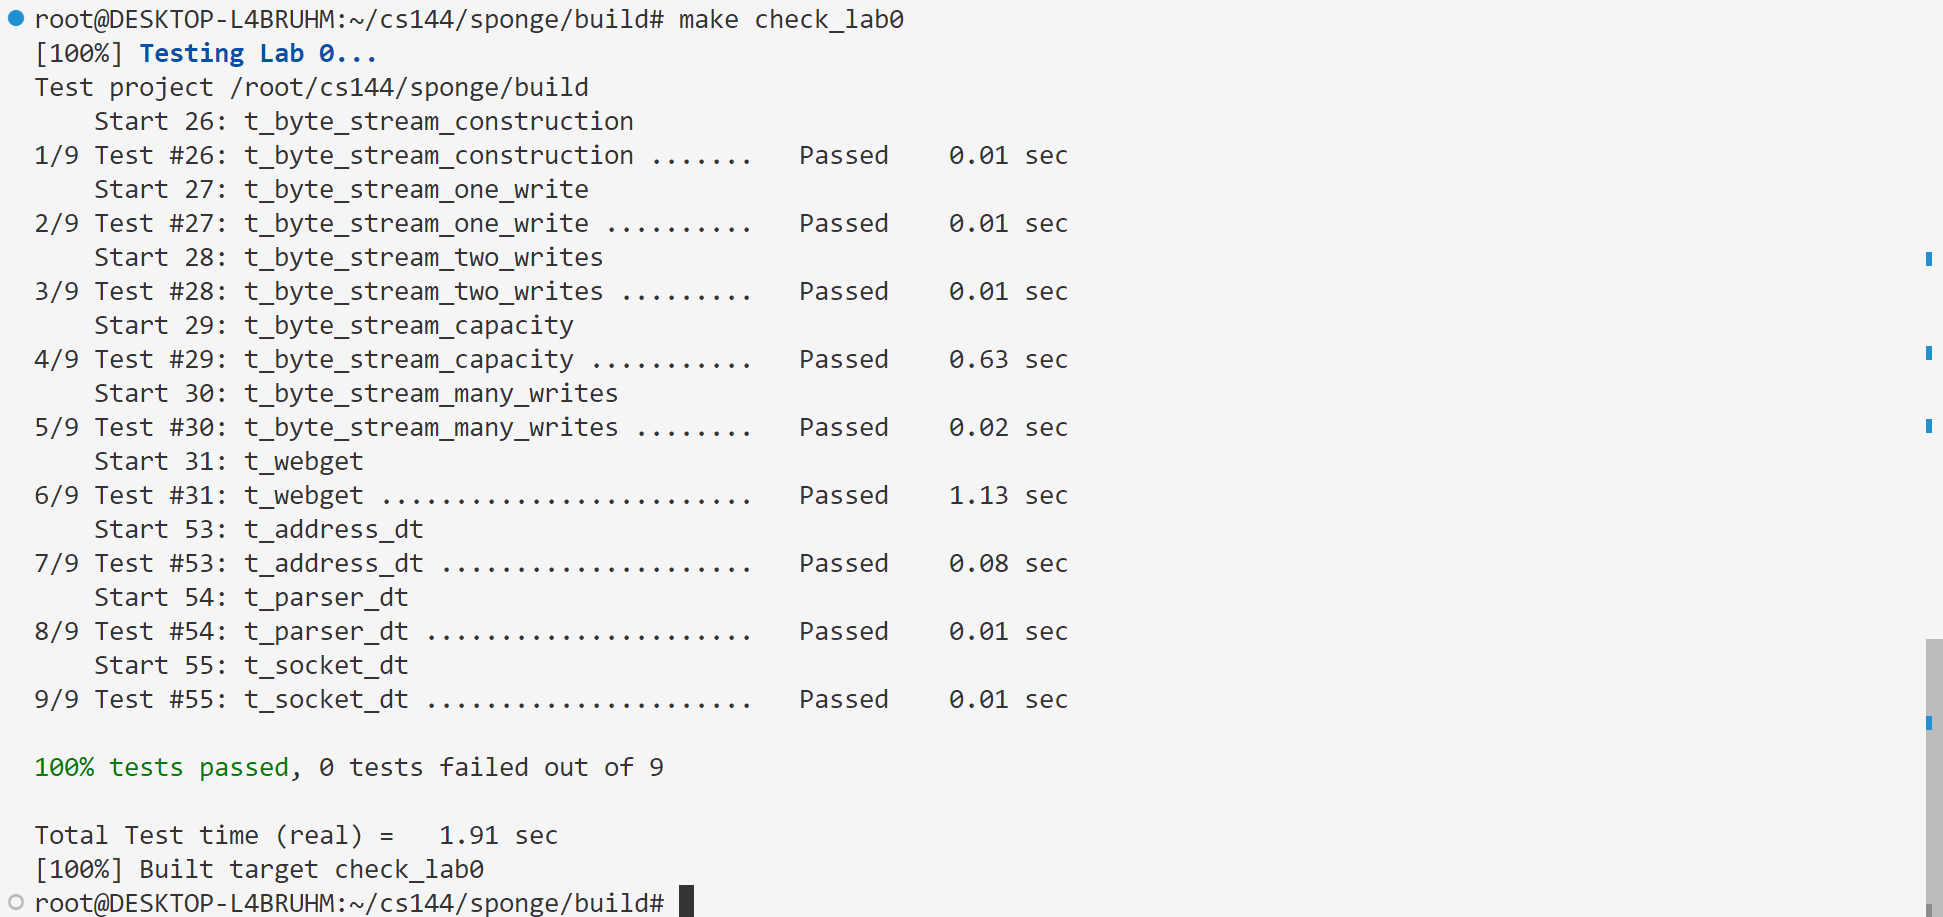
存档
暂时无法在飞书文档外展示此内容