[TOC]
Spring
1-简介
1.1-什么是Spring框架
一个容器,是整合其他框架的框架,核心是IOC(控制反转)和AOP(面向切面编程),它由20多个模块构成,它在很多领域都提供优秀的解决方案
1.2-Spring特点
轻量级:有20多个模块构成每个包都很小,小于1M,核心包也就3M
无侵入:对代码无污染
面向接口编程:使用接口就是面向灵活。项目的可扩展性、可维护性则很高。接口不关心实现类的类型使用时接口指向实现类,切换实现类即可切换整个功能。
AOP:将公共、重复代码抽取出来,单独开发,需要时反织回去。AOP采用的是横向切面的方式,注入与主业务流程无关的功能,例如事务管理和日志管理。

下面是一个经典是AOP实现
AspectJ 是一个采用Java 实现的AOP框架,它能够对代码进行编译(一般在编译期进行),让代码具有AspectJ 的 AOP 功能,AspectJ 是目前实现 AOP 框架中最成熟,功能最丰富的语言。ApectJ 主要采用的是编译期静态织入的方式。在这个期间使用 AspectJ 的 acj 编译器(类似 javac)把 aspect 类编译成 class 字节码后,在 java 目标类编译时织入,即先编译 aspect 类再编译目标类。

整合其他框架:整合完框架后更加易用。
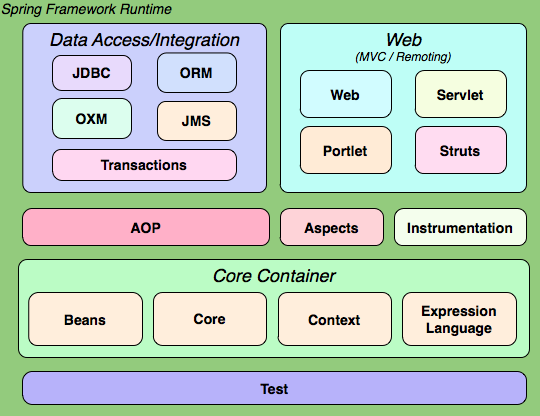
1.3-Spring体系结构
核心容器:Bean、Core、Context上下文、EL表达式
2-IOC
2.1-什么是IOC
控制反转是一种概念,一种思想,由Spring控制对象的创建、依赖注入,程序员在使用时直接抽取。
正转:由程序员创建对象并进行依赖注入,程序员说了算
反转:Spring说了算
通过在XML文件中配置Bean,Spring容器负责对象的创建与赋值
<?xml version="1.0" encoding="UTF-8"?>
<beans xmlns="http://www.springframework.org/schema/beans"
       xmlns:xsi="http://www.w3.org/2001/XMLSchema-instance"
       xsi:schemaLocation="http://www.springframework.org/schema/beans http://www.springframework.org/schema/beans/spring-beans.xsd">
<!-- 配置Student类 -->
<bean id="stu01" class="org.example.Student"></bean>
</beans>
2.2-IOC简单案例
创建Student类:
public class Student {
    private String name;
    private int age;
}正转:
    @Test
    public void testStudent(){
        Student stu = new Student();// 创建对象
        System.out.println(stu.toString());
    }
反转
配置Bean
    @Test
    public void testStudentSpring(){
        ApplicationContext ctx = new ClassPathXmlApplicationContext("applicationContext.xml");
        Student stu = (Student) ctx.getBean("stu01");
        System.out.println(stu.toString());
    }
2.3-Setter注入
setter必须要提供无参构造方法和对应的set方法
2.3.1-简单类型注入
简单类型注入使用value属性
<bean id="stu01" class="org.example.Student">
    <property name="age" value="10"/>
    <property name="name" value="Trump"/>
</bean>
2.3.2-引用类型注入
简单类型注入使用ref属性
创建Teacher类
public class Teacher {
    private String name;
    private int id;
    private Student student;
}
在xml中配置
    <bean id="teacher01" class="org.example.Teacher">
        <property name="name" value="Kongzi"/>
        <property name="id" value="007"/>
        <property name="student" ref="stu01"/>
    </bean>
测试一下
    @Test
    public void testTeacher(){
        ApplicationContext ctx = new ClassPathXmlApplicationContext("applicationContext.xml");
        Teacher teacher = (Teacher) ctx.getBean("teacher01");
        System.out.println(teacher.toString());
    }
2.4-构造方法注入
public class User {
    private Integer uid;
    private String uname;
    private Integer uage;
}
2.4.1-按参数名称
    <bean id="usr01" class="org.example.pojo.User">
        <constructor-arg name="uid" value="007"/>
        <constructor-arg name="uname" value="hypervoid"/>
        <constructor-arg name="uage" value="18"/>
    </bean>
2.4.1-按参数下标
    <bean id="usr02" class="org.example.pojo.User">
        <constructor-arg index="2" value="18"/>
        <constructor-arg index="1" value="hypervoid"/>
        <constructor-arg index="0" value="007"/>
    </bean>
2.4.1-按参数类型顺序
<bean id="usr03" class="org.example.pojo.User">
<constructor-arg value="003"/>
<constructor-arg value="hypervoid"/>
<constructor-arg value="18"/>
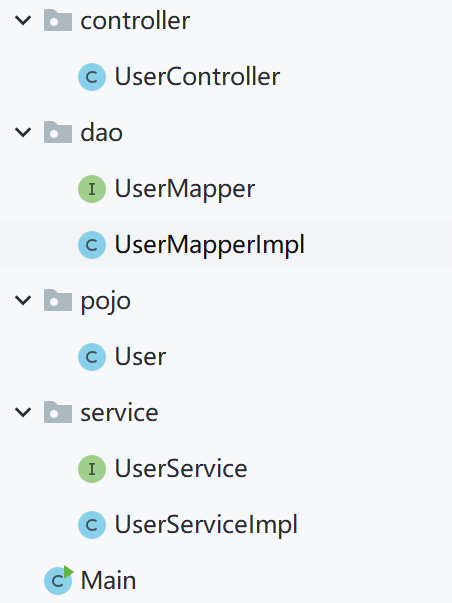
</bean>3-三层架构项目
使用三层架构进行用户的插入操作。 界面层,业务逻辑层,数据访问层(模拟). Spring会接管三层架构中哪些对象的创建? 非Spring接管下的三层项目构建:
| 层 | 包 | 实现类 |
|---|---|---|
| 实体类 | pojo | User |
| 数据访问层 | dao | UserMapper、UserMapperImpl |
| 业务逻辑层 | service | UserService、UserMapperImpl |
| 界面 | controller | UserController |
3.1-原生实现
原生的MVC实现层层调用层层执行,每一层都需要新建一个对象

    public void testInsertUser(){
        UserController userController = new UserController();
        int n = userController.insert(new User(100,"zc",22));
        System.out.println(n);
    }
百万次执行用时183ms
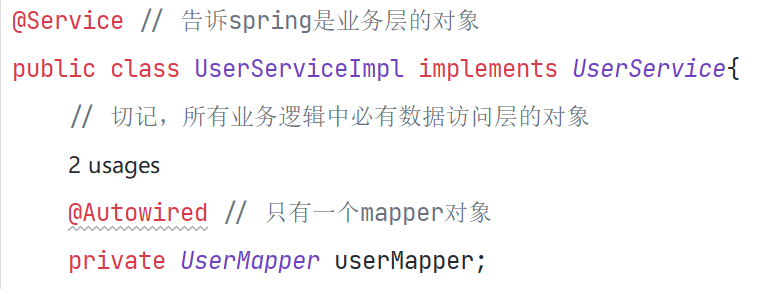
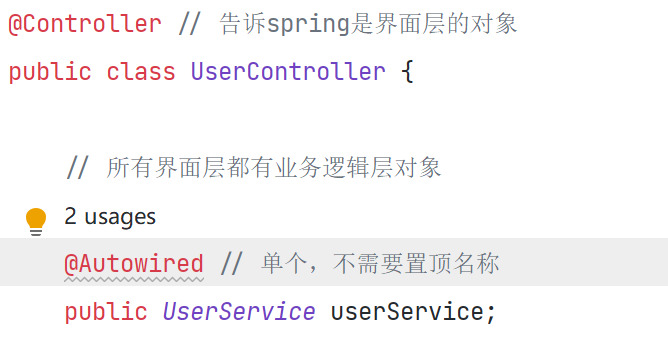
3.2-Spring实现
<?xml version="1.0" encoding="UTF-8"?>
<beans xmlns="http://www.springframework.org/schema/beans"
       xmlns:xsi="http://www.w3.org/2001/XMLSchema-instance"
       xsi:schemaLocation="http://www.springframework.org/schema/beans http://www.springframework.org/schema/beans/spring-beans.xsd">


<!--数据访问层-->
    <bean id="uMapper" class="org.example.dao.UserMapperImpl"/>
<!--    业务层-->
    <bean id="uService" class="org.example.service.UserServiceImpl">
        <property name="userMapper" ref="uMapper"/>
    </bean>
<!--    界面层对象-->
    <bean id="uCtrl" class="org.example.controller.UserController">
        <property name="userService" ref="uService"/>
    </bean>
</beans> @Test
public void testInsertUser(){
User u = new User(100, "Trump",88);
ApplicationContext ctx = new ClassPathXmlApplicationContext("ctx.xml");
UserController uCtrl = (UserController) ctx.getBean("uCtrl");
int n = uCtrl.insert(u);
System.out.println(n);
}3.3-注解实现
-
首先添加包扫描
<context:component-scan base-package="org.example"/> -
配置数据访问层

-
配置业务逻辑层
-
配置界面层
4-基于注解的IOC
基于注解的IOC
也称为:DI(Dependency Injection)IOC具体实现的技术
药: 创建对象并依赖注入
汤:xml 注解annotation
1)创建对象的注解
@Component:可以创建任意对象,创建对象的默认名称为对象的首字母小写驼峰名,也可指定名称
@Service:专门用来创建业务逻辑层的对象,负责向下访问数据间层,处理完毕后的结果返回给界面层
@Repository:专门用来创建数据访问层的对象,负责数据库中的增删改查所有操作.
2)依赖注入的注解
值类型的注入
@Value:用来给简单类型注入值
引用类型的注入
A.@Autowired:使用类型注入值.从整个Bean中搜索同源类型的对象进行注 入 .
B.@Autowired
@Qualifier:使用名称注入值,从整个Bean工厂中搜索相同名称的对象进行注入.
Student类
//@Component  // 交给spring去创建对象,在容器启动时创建
// 默认为student,也可以自行设置
@Component("stu01")
public class Student {
    private int id;
    private String stuName;
    public Student(){
        System.out.println("student 无参构造");
    }
}
4.1-类型注入
4.1.1-简单类型
    @Value("001")
    private int id;
    @Value("jack")
    private String stuName;
4.1.2-引用类型
只有同源类型才能注入:
- 同类型
- 子类和父类
- 接口和实现类
@Component
public class Teacher {

    // 引用类型按类型注入
    @Autowired
    private Student stu;
    @Value("001")
    private  int id;

    @Value("Dan boneh")
    private String name;
}
public class Teacher {
// 指定注入
@Autowired // 必须要由此注解,否则找不到student
@Qualifier("stu01") // student对象必须加上对象名称,不能为默认值
private Student stu;
@Value("001")
private int id;
@Value("Dan boneh")
private String name;4.1.3-父子类注入
插件Monitor类继承Student类
@Component("monitor")
public class Monitor extends Student{

    @Value("-1")
    private int id;
    @Value("Monitor")
    private String stuName;
}
以按类型的方式无法注入,因为存在多个相同的类型
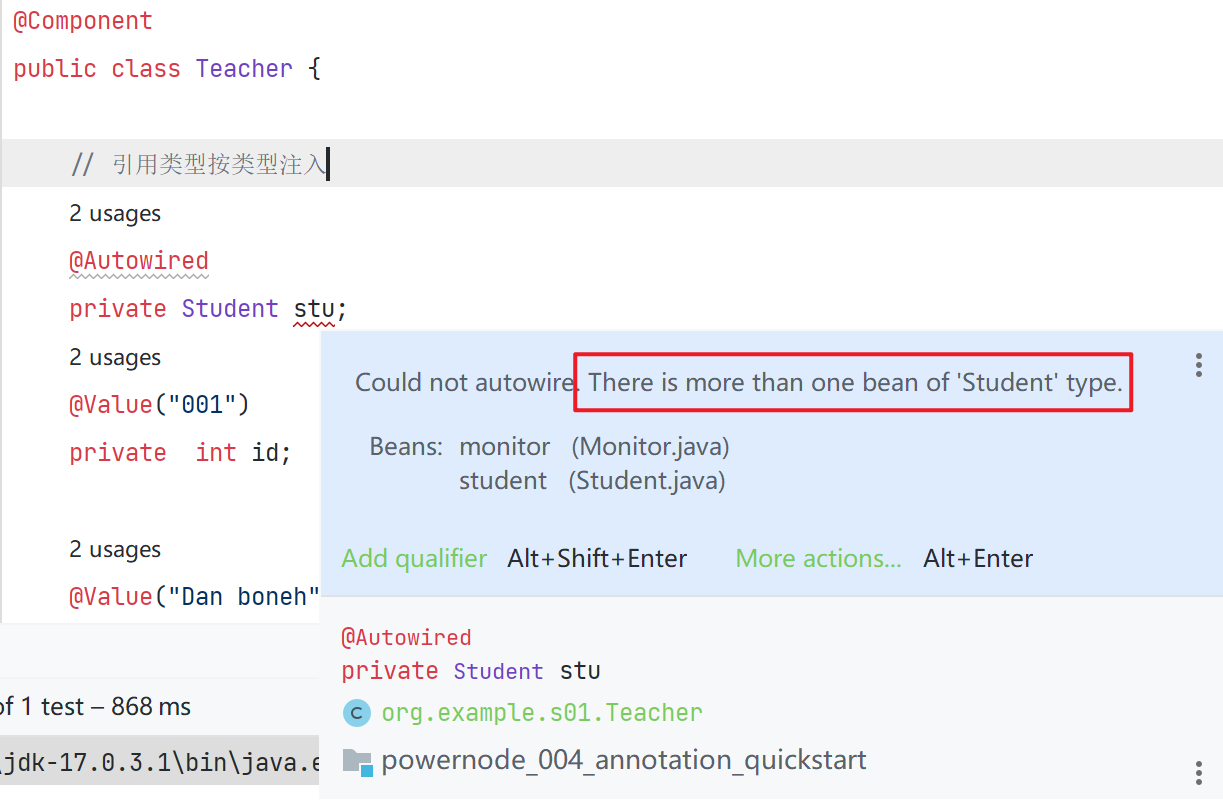
尝试使用按名称注入
@Component
public class Teacher {
    // 引用类型按类型注入
    @Autowired
    @Qualifier("monitor")
    private Student stu;
    @Value("001")
    private
    int id;
}
5-面向切面编程AOP
5.1-什么是AOP
AOP:Aspect Orient Programming
切面:公共的通用的重复的功能,称为切面。面向切面编程就是将切面提取出来单独开发,在需要调用的方法中通过动态代理的方式进行织入。
手写AOP框架:
- 版本1:业务和切面紧耦合,没有拆分
- 版本2:使用子类代理方式拆分业务和切面
- 版本3:使用静态代理拆分业务和切面,此时切面紧耦合在业务中
- 版本4:使用子类代理方式拆分业务和业务接口,切面和切面接口
- 版本5:动态代理优化版本4
5.2-手写AOP
5.2.1-无拆分
紧耦合在一起,编码在一起,很难修改
public class BookServiceImpl {
    public void buy(){
        try{
            System.out.println("事物开启");
            System.out.println("业务功能实现");
            System.out.println("事物提交");
        }catch (Exception e){
            System.out.println("事物出错,事物回滚");
        }
    }
}
5.2.2-子类代理
父类
package org.example;

public class BookServiceImpl {
    // 基类只有干干净净的业务
    public void buy(){
        System.out.println("业务功能实现");
    }
}
子类
/**
 * 代理类,将父类的功能添加事物切面
 */
public class SubBookServiceImpl extends BookServiceImpl{
    @Override
    public void buy(){
        try{
            // 事物切面
            System.out.println("事物开启");
            // 主业务实现
            super.buy();
            //
            System.out.println("事物提交");
        }catch (Exception e){
            System.out.println("事物出错,事物回滚");
        }
    }
}
5.2.3-静态代理拆分业务和切面
使用静态代理,通过传入业务的实现类,我们可以实现目标对象的灵活切换
package org.example;

/**
 * 静态代理:实现了目标对象的灵活切换
 * 图书购买业务、商品购买业务
 */
public class Agent implements Service{
    private Service service;
    public Agent(Service service){
        this.service = service;
    }
    @Override
    public void buy() {
        try {
            // 切面功能
            System.out.println("事物开启");
            // 业务功能
            service.buy();
            // 切面功能
            System.out.println("事物提交");
        }catch (Exception e) {
            System.out.println("事物回滚");
        }
    }
}
5.2.4-静态代理拆分全部


public class Agent implements Service{
    private AOP aop;
    private Service service;
    @Override
    public void buy() {
        try{
            aop.before();
            service.buy();
            aop.after();
        }catch (Exception e){
            aop.exception();
        }
    }
    public Agent(AOP aop, Service service){
        this.aop = aop;
        this.service = service;
    }
}
public interface AOP{
default void before(){}
default void after(){}
default void exception() {}
}5.2.5-动态代理-更spring-like的实现
动态代理实际上是业务功能的代理
public class ProxyFactory {
    public static Object getAgent(Service service, AOP aop){
        return Proxy.newProxyInstance(
                // 类加载器
                service.getClass().getClassLoader(),
                // 目标对象实现的所有接口
                service.getClass().getInterfaces(),
                // 代理功能实现
                new InvocationHandler() {
                    /**
                     * @param proxy  生成的代理对象
                     * @param method 正在被调用的目标方法 如buy()
                     * @param args   目标方法的参数
                     */
                    @Override
                    public Object invoke(Object proxy, Method method, Object[] args) throws Throwable {
                        Object ret = null;
                        try {
                            aop.before();
                            ret = method.invoke(service, args);
                            aop.after();
                        } catch (Exception e) {
                            aop.exception();
                        }
                        return ret;
                    }
                }
        );
    }
}
5.3-spring原生AOP
6-Spring集成MyBatis
- 建表
- 修改配置文件
- 修改pom.xml文件,添加相关的依赖(使用老师提供)
- 添加MyBatis相应的模板(SqlMapConfig.xml和XXXMapper.xml文件)
- 添加SqlMapConfig.xml文件(MyBatis核心配置文件)
- 加applicationContext mapper . xml
- 加applicationContext service.xml
- 加Users实体类,Accounts实体类
- 添加mapper包,添加UsersMapper接口和UsersMapper.xml文件并开发
- 添加service包,添加UsersService接口和UsersServiceImpl实现类
- 添加测试类进行功能测试
6.1-创建表
CREATE DATABASE ssm;

use ssm;

CREATE TABLE `users` (
    uid INT PRIMARY KEY ,
    uname VARCHAR(20),
    upass VARCHAR(20)
);

CREATE TABLE accounts(
    aid INT PRIMARY KEY ,
    aname VARCHAR(20),
    acontent VARCHAR(50)
);

select uid, uname, upass from users ;
select aid, aname, acontent from accounts ;

-- 删除表的内容
delete from users ;
delete from accounts ;
6.2-配置文件
pom配置
    <dependencies>
        <dependency>
            <groupId>junit</groupId>
            <artifactId>junit</artifactId>
            <version>4.13.2</version>
            <scope>test</scope>
        </dependency>
        <dependency>
            <groupId>org.mybatis</groupId>
            <artifactId>mybatis</artifactId>
            <version>3.5.10</version>
        </dependency>
<!--        数据库相关-->
        <dependency>
            <groupId>org.mybatis</groupId>
            <artifactId>mybatis-spring</artifactId>
            <version>2.0.7</version>
        </dependency>
        <dependency>
            <groupId>mysql</groupId>
            <artifactId>mysql-connector-java</artifactId>
            <version>8.0.29</version>
        </dependency>

        <!--        jdbc连接数据库-->
        <dependency>
            <groupId>org.springframework</groupId>
            <artifactId>spring-jdbc</artifactId>
            <version>5.3.20</version>
        </dependency>
        <!--        数据库连接池-->
        <dependency>
            <groupId>com.alibaba</groupId>
            <artifactId>druid</artifactId>
            <version>1.2.11</version>
        </dependency>

        <dependency>
            <groupId>org.springframework</groupId>
            <artifactId>spring-context</artifactId>
            <version>5.3.20</version>
        </dependency>
<!--        aspectsJ 依赖-->
        <dependency>
            <groupId>org.springframework</groupId>
            <artifactId>spring-aspects</artifactId>
            <version>5.3.20</version>
        </dependency>

<!--        事物依赖-->
        <dependency>
            <groupId>org.springframework</groupId>
            <artifactId>spring-tx</artifactId>
            <version>5.3.20</version>
        </dependency>
    </dependencies>
配置SqlMapConfig
<?xml version="1.0" encoding="UTF-8" ?>
<!DOCTYPE configuration PUBLIC "-//mybatis.org//DTD Config 3.0//EN" "http://mybatis.org/dtd/mybatis-3-config.dtd">
<configuration>

    <!--通过properties标签加载外部properties文件-->
    <properties resource="db.properties"/>

    <settings>
        <setting name="logImpl" value="STDOUT_LOGGING"/>
    </settings>
    <!--自定义别名-->
    <typeAliases>
        <package name="org.example"/>
    </typeAliases>

    <!--数据源环境-->
    <environments default="development">
        <environment id="development">
            <transactionManager type="JDBC"/>
            <dataSource type="POOLED">
                <property name="driver" value="${jdbc.driver}"/>
                <property name="url" value="${jdbc.url}"/>
                <property name="username" value="${jdbc.username}"/>
                <property name="password" value="${jdbc.password}"/>
            </dataSource>
        </environment>
    </environments>


</configuration>
配置mapper的spring配置
<?xml version="1.0" encoding="UTF-8"?>
<beans xmlns="http://www.springframework.org/schema/beans"
       xmlns:xsi="http://www.w3.org/2001/XMLSchema-instance"
       xmlns:context="http://www.springframework.org/schema/context"
       xsi:schemaLocation="http://www.springframework.org/schema/beans http://www.springframework.org/schema/beans/spring-beans.xsd http://www.springframework.org/schema/context https://www.springframework.org/schema/context/spring-context.xsd">
    <!--读取属性文件db.properties -->
    <context:property-placeholder location="db.properties"/>
    <!--创建数据源-->
    <bean id="dataSrc" class="com.alibaba.druid.pool.DruidDataSource">
        <property name="driverClassName" value="${jdbc.driver}"/>
        <property name="url" value="${jdbc.url}"/>
        <property name="username" value="${jdbc.username}"/>
        <property name="password" value="${jdbc.password}"/>
    </bean>
    <!--配置SqlSessionFactory类-->
    <bean class="org.mybatis.spring.SqlSessionFactoryBean">
        <!--配置数据源-->
        <property name="dataSource" ref="dataSrc"/>
        <!--配置MyBatis核心配置文件-->
        <property name="configLocation" value="SqlMapConfig.xml"/>
        <!--注册实体类别名-->
        <property name="typeAliasesPackage" value="org.example.pojo"/>
    </bean>
    <!--注册mapper.xml文件-->
    <bean class="org.mybatis.spring.mapper.MapperScannerConfigurer">
        <property name="basePackage" value="org.example.mapper"/>
    </bean>
</beans>
删除重复配置的部分